Showing posts with label sage. Show all posts

Sunday, November 23, 2014

Fun Fruit & Herb Vinegars

Over the years I have come up with numerous herb, fruit and flower combinations that I use when making flavoured vinegars.   I like to give these beautiful bottles as hostess and Christmas gifts.  It is ideal if you make these throughout the summer from your garden herbs and local berries.  I will mention a few that you can create during the winter months with fresh or frozen fruits and fresh herbs you can get from the store. 

Below is a photo of some of the summer vinegars I made (left to right): strawberry balasamic vinegar, apple cider with sage and cranberry and raspberry white wine vinegar.  I use them to add inspiration to my winter salads!  Follow this link to get a print copy of this blog post.


Vinegar is fermented wine derived from the French word vin aigre.  It contributes a bright, sharp flavour to food and can seriously reduce the amount of salt needed in recipes.  Vinegar, and other acidic foods such as tomatoes and lemon juice, have been shown to lower the glycemic index of the dish they are used in.  This means food is more slowly digested and leads to a slower rise in blood sugar.  Vinegar has next to no calories and is a friend of those watching their weight or those changing their food ways to manage heart disease, hypertension and diabetes.

The type of vinegar you use to make your flavoured vinegars depends on your preference, what you like to cook and your pocket book.  Higher prices are attached to the best vinegars.  I don't use everyday white distilled vinegar for much other than cleaning my toilet (did I say that?).  Vinegar lasts quite a while and gets used slowly so I buy the good ones and enjoy them.  The photo below shows the types of organic vinegar I have been using.


Apple Cider Vinegar is my everyday all purpose vinegar.  I buy a raw, unpasteurized, wood aged and organic apple cider vinegar from Eden organics.  It has the live "mother" or vinegar culture which appears as a cloudiness in the bottle.  This type of vinegar pairs well with fruits like apple, cranberry and pear.  It also goes well with strong herbs like tarragon, thyme, sage and rosemary.

Balsamic vinegar is traditionally made from Trebbiano grapes and aged in oak barrels.  It has a sweetish after-taste.  I have a Silver Leaf traditional Balsamico organic vinegar from Greece.  The real balsamic is aged 12 years for "vecchio" and 25 years for "extra vecchio."  Much of what we buy in the store is actually a wine vinegar with added caramel for colour and flavour. 

Rice vinegar is made from fermented rice or rice wine alcohol.  It has a subtle, sweet flavour.  Buy the unseasoned one without added sugar or salt.

Wine vinegars - white or red wine grapes are fermented in oak.  They range in flavour from mellow to sharp.  The white wine vinegar I am using is from Spectrum Natural and it is organic and a product of Modena, Italy.  They say it is a blend of Italian white wines that has been slowly fermented and aged.  The Inari red wine vinegar I am using is also organic and contains mother.  It is from Italy as well.

BERRY and HERB VINEGAR
Use on green salads, fruit salads or as part of a marinade for meat or poultry.  The vinegar will tenderize tougher cuts of meat and the taste will cook off (trust me)!  The benefit of using frozen berries is that they are cleaned and ready to go. 

1 cups (250 ml) fresh or frozen berries (e.g., cranberries, raspberries, blueberries)
Sprigs of fresh herbs, cleaned and dry
3 cups (750 ml) cider or other vinegar

Experiment!  Try:
- fresh apple slices, thyme and apple cider vinegar
- cranberry, sage and apple cider
- cranberry and rosemary with any vinegar is particularly festive for Christmas
- blueberry thyme and balsamic vinegar
- strawberries in balsamic vinegar
- raspberry, mint and white wine vinegar 

METHOD:

1.  Stuff berries and herbs into clean and sterilized bottles.   You can wiggle things around with a chop stick or skewer to get an artful arrangement.  The quantities above for berries and vinegar are approximate. 


2.  Pour vinegar of your choice over.  I like to use a funnel when I do this.  Make sure the herbs are completely covered as they can grow mold if they are not.  Add a bit extra if possible as the fruit and herbs will absorb a bit of the vinegar as they sit.  

3.  Seal, label and date.  Store in a cool place or refrigerator as berries have a tendency to ferment.  Read further down for more tips on the process.

HERBS:
You will need fresh herbs to go with the berries.  They are a bit pricey but there is a good selection in most grocery stores.  You can also add dried herbs to the vinegar if you prefer.  The flavour will be good but they are not as pretty.  When you begin using the vinegar be sure to remove any exposed herbs as the bottle empties.  If you don't take this precaution molds can grow on the exposed herbs.


BOTTLES TO USE:
Reduce, reuse, recycle.  This is your opportunity to clean and sterilize some bottles and jars that you like.  The first photo in this post shows (left to right) recovered whiskey bottle, tamari bottle and juice bottle.   Use bottles or glass jars that are free of chips or cracks.  Good choices are clear wine and liquor bottles.  You can pick up decorative bottles at many dollar stores but I prefer to recycle when I can.

HOW TO CLEAN AND STERILIZE BOTTLES:
Thoroughly soak and wash the bottles.   Remove old labels.  A baby bottle brush is handy for this task.  Sterilize them by immersing in a pan of water and simmering for 10 minutes.  Once sterilized, remove from water and invert on kitchen towel to dry.  Use while warm.

HOW TO SEAL YOUR BOTTLES:
You can buy stoppers at a wine making store.  They usually have cork or plastic stoppers.  I buy the plastic as they are easy to put through the dishwasher and keep clean.  I also buy the heat shrink covers they put over wine bottles.  They shrink around the bottle when immersed in boiling water.  You can also use steam from a kettle to shrink the wraps.


Yours in good taste, © Nancy Guppy, RD, MHSc.  http://nancyguppy.com/

Tuesday, November 4, 2014

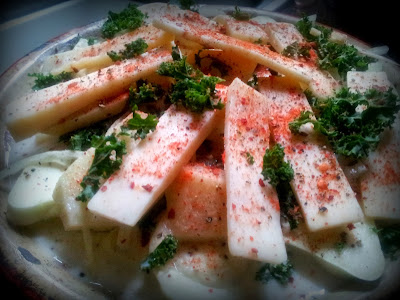
Potato & Kale Pie

This is a re-work of my mom's scalloped potatoes.  Depression food.  I changed the name to get my now adult children to eat it even though they knew it was a version of the scalloped potatoes I was raised on.  "Something about the word scalloped" my daughter said.  I think it is incredibly good.

I make it often switching up various fresh herbs and vegetables layered with the potatoes.  The thinly sliced layers of onion, herbs etc are sprinkled with salt, pepper, flour and a bit of butter and then scalded milk is poured over.  It bakes up thickened without the need to make a white sauce or used canned cream soup.  Leftover chopped ham is also a popular addition between the layers.


This is an "about" recipe. The measurements aren't exact. You just make the number of pies/pans you want. The leftovers re-heat so well it shouldn't be a problem getting people to eat it up later.

Click on this link to get a printable recipe.
INGREDIENTS:
Per 9 inch (23 cm) pie plate

2 medium large potatoes, washed, but peel on, sliced about 1/4 inch thick
a few cups of kale, chopped.  Remove the stem if it is tough
1 small zucchini or patty pan squash, rutabaga or turnip, sliced same thickness of the potatoes
I medium onion, sliced thin
potato flour between layers, about a 1/2 tsp (2.5 ml) per layer - use any flour - I use gluten free potato or brown rice flour
sprinkle of salt and pepper and a bit of butter between the layers
minced herbs between the layers - I like sage and thyme leaves but use what you have on hand
1+ clove garlic, minced also spread between the layers
2 cups scalded milk to pour over - 500 ml
Top with grated cheese like old cheddar.

METHOD:
1.  Butter, oil or spray two 9 inch pie plates (2 inch deep).  I use butter as it is traditional for old school scalloped potatoes.
2.  Slice potatoes, kale, turnip/rutabaga and onion.  Peel on for potatoes and the onion gets cut into rings.  Make potato and rutabaga slices similar size pieces so they have similar cooking times.


3.  Put the milk in a saucepan and heat over medium high heat to scald which is just before boiling.  Whisk along the way.  Don't boil the milk as it can clump.
4.  Mince fresh herbs and set aside.
5.  Grate or slice cheese and set aside.
6.  To assemble place layer of potatoes over bottom of pan.  Sprinkle with some of the onions, chopped kale and then sprinkle with salt, pepper, minced herbs and the flour.  Dot with layer with a bit of butter.


7.  Add layer of rutabaga and repeat step 6.

8.  Sprinkle cheese over top and bake at 300'F for 45-60 minutes or until sauce is thickened and cheese is lightly browned.  Believe it or not I couldn't find the grater so the cheese got sliced.  Dig around the fridge and use the odds and sods of cheese that need to be used up.


Option:  Ham is a nice addition between layers. 


Yours in good taste,
© Nancy Guppy, RD, MHSc
http://nancyguppy.com/

Sunday, October 24, 2010

Asiago Roasted Tomatoes


I've been looking for easy recipes to help use up my bumper crop of garden tomatoes. Here is one I made from the local newspaper "Community Voices." The original recipe was by well known editor of Canadian Living magazine Elizabeth Baird. I used a full fat sour cream instead of the the mayonnaise in her version.

INGREDIENTS:
1 pound (450 g) tomatoes, red, ripe
2 tsp (10 ml) olive oil, XV, cold pressed
1/2 tsp (2.5 ml) sugar, cane
1/4 tsp (1.25 ml) sea salt
1/4 tsp (1.25 ml) black pepper, freshly ground
3 Tbs (45 ml) sour cream, 14% MF
2 Tbsp (30 ml) Asiago cheese, grated/shredded
2 Tbsp (30 ml) parsley, fresh, chopped
1 cup (250 ml) arugula, fresh, torn

METHOD:
1. Cut tomatoes in half cross-wise. Arrange cut side up in a shallow baking dish. Brush with olive oil followed by a sprinkle of sugar (or honey), salt and pepper.


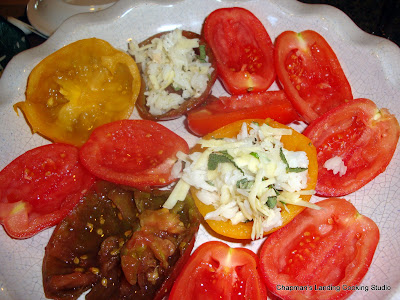
Above are black krim heirloom tomatoes. They are ripe even though they appear part green still. I used an assortment of what I had on hand... beef steak, yellow and the black krim tomatoes.


2. Roast in a 400'F (200'C) oven until hot and starting to release their juices... about 30 minutes. Drain off liquid.


3. Make the topping by mixing the sour cream with the grated Asiago, Dijon mustard, minced fresh rosemary and sage. Spread mixture over top of tomatoes. Use other fresh herbs if you don't have these on hand. Dried will do fine... just reduce the amount (1 tsp dried = 1 Tbsp fresh).


4. Sprinkle dish with the additional Asiago cheese and broil about 6 inches from heat until topping is bubbling and brown - about 2 minutes.


5. Remove from oven and allow to cool. Sprinkle with fresh arugula and parsley.


Nutrition Facts (per ¼ recipe - 150 g serving): 90 calories, 6 g fat, 3 g saturated fat, 10 mg cholesterol, 6 g carbohydrate, 2 g fibre, 4 g sugar, 3 g protein. %Daily Values based on a 2,000 calorie diet are 10% calcium, 4% iron, 20% vitamin A and 30% vitamin C.


Tastefully yours,
© Nancy Guppy, RD, MHSc
http://nancyguppy.com/

Sunday, October 3, 2010

Herb and Rice Stuffed Tomatoes

Here's an easy lunch or supper dish that uses the large tomatoes that are available during the local harvest.  Combine with your favourite garden herbs, shredded cheese and leftover cooked rice.


1 cup
250 ml
Rice, brown, cooked
4 large
4 large
Tomatoes (or 8 medium)
1
1
Garlic, clove, minced
1 cup
250 ml
Cheddar cheese, old, shredded
1 Tbsp
15 ml
Olive oil, extra virgin, cold pressed
2 Tbsp
30 ml
Parsley, fresh, minced
2 tsp
10 ml
Rosemary, fresh, minced (or other herb like lavender)
1 Tbsp
15 ml
Sage, fresh, minced
1/4 tsp
1.25 ml
Salt, sea
¼
1.25 ml
Pepper, black, freshly ground


I used an assortment of Black Krim, yellow, red beef steak and plum tomatoes depending on what was ripe and had to be used.  We grew a lot of tomatoes this year.


Heirloom Black Krim tomato above and below.  There were a lot of different types of tomatoes planted close together so these varieties may be cross pollinated.


METHOD:
1. Cut tomatoes in half.  Scoop out pulp around seeds.  Reserve/freeze for another use.  I use it in soups and stews.


2.  Combine the cooked rice, minced garlic, grated cheese, olive oil, minced fresh herbs, salt and black pepper. Below I have a combination of fresh lavender and rosemary.  I used sage as well.  You can use what you have on hand.


3.  Stuff the tomatoes with the mixture.


4.  Arrange tomatoes in a oven proof dish and bake uncovered @ 350 degrees for 45 min-1hour. 


NOTE:  
This is enough stuffing for 2 large tomatoes or 4 medium.  Double or triple recipe as desired.
The longer baking time will make the rice and cheese a bit crispy.  You can also cover and bake if you want a softer end product.

Nutrition Facts (per ¼ recipe - 250 g serving)

Calories
230
Total Fat (g)
14
Saturated Fat (g)
7
Cholesterol (mg)
30
Carbohydrate (g)
19
Fibre (g)
3
Sugar (g)
5
Protein (g)
10
%Daily Values
Sodium (330 mg)
14
Calcium
25
Iron
6
Vitamin A
2
Vitamin C
40

My next cooking class is Meal from Oaxaca (Mexico) on Saturday October 16th.  You can learn how to make healthy Mexican recipes while having fun and socializing over fine food.  This class suits those who want to follow a gluten free, heart healthy and/or diabetic diet.